Making a Quillow
Making a quillow is fairly straight forward, although the size of the
single quilt making can be a bit cumbersome, however why not try
yourself.
A Quillow basically comes in two halves and both are made separately then joined together at the end.
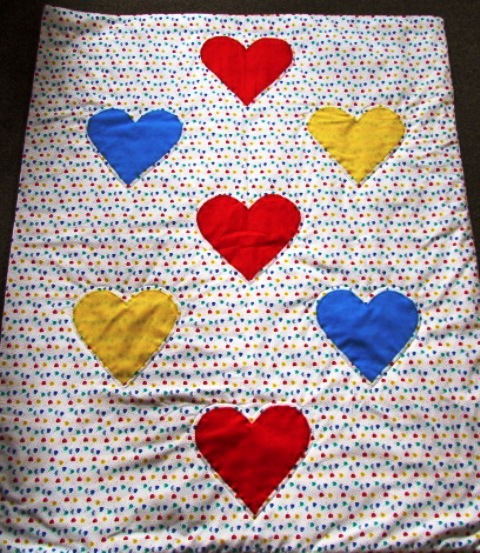
The first half is the Pocket, sometimes called the cheater square and is the front on the cushion cover when it is all folded up.
The second half is the larger rectangular shape of the quilt that is folded into the first half.
Materials needed for making a quillow
Approximate size is 42"(107cms) wide by 70"(178cms) long.
- Two
lengths of material 45"(114cms) wide by 72"(183cms) long. One for the
outside fabric and another in a contrasting fabric for the inside.
- one
length of material 18"(46cms) wide by 18"(46cms) long, this has to be
the same material as the one chosen for the outer fabric as this will be
the back of the pocket or cheater square.
- One front picture
panel (if a picture is wanted) otherwise another 18"(46cms) square of
material of either material depending on what type of quillow you want
to make.
- Wadding (sometimes called batting) enough to line the pocket and the quilt.
TIP: When I am making a quillow I buy two and a half metres of the material I am going to use for the outer casing, as this will then give enough for the back of the pocket and a bit left over, and two metres of the inside material. The material width is roughly 45"(114cms) wide. Two metres of wadding is usually enough as it is very wide so there will also be some left over. I then trim the length as it is difficult to get it the exact length.
Making the Pocket or Cheater Square without a picture
- Place the pocket square of wadding on a flat surface, place one piece of pocket material face up and the other face down both on top of the wadding.
- Pin through all of the layers.
- Sew using 1/2 inch(1.5cms) seam allowance all around the outside edge, starting and finishing with a backstitch and leaving a 8 inch (20cms) gap to allow for turning right side out. It is easy to start at one side of the gap and finish at the other so that you don't forget.
- Trim away any excess wadding or material and trim corners.
- Turn right sides out.
- Slip stitch the opening closed and then quilt to keep the wadding in place either by attaching motifs or ribbons or highlighting a design on the fabric.
Making a Picture Cheater Square
When you buy a picture panel you may find that it is not the right size or it may need trimming if it isn't square. You will then need to attach strips of material the same colour as the outside material to make it bigger.
The strips should be attached to the picture panel opposite sides first and pressed together towards the border not open and flat. Then the other ones added.
When this is done and the pocket square is the correct size, for making a quillow, continue making the pocket as described in the steps above. If there is a definite top and bottom to the picture then the opening should be at the top.
Then quilt along various outlines of the picture to enhance it and to attached the wadding as previously stated.
Making the quillow (inside quilt)
- Lay the wadding on a flat surface and place one piece of material face up and the other face down on top of it.
- Pin through all layers leaving a 12"(30.5cms) gap on one of the shorter edges.
- Sew with the same seam allowance as the pocket all around the outside edge.
- Trim any excess wadding or material and corners. Turn right sides out and slip stitch opening closed.
Joining the Pocket onto the Quilt
Mark
the centres of each top edge (where this has been slip stitched) with a
pin. Place pocket face down on the material used for the outside of the
quillow, matching the centres.
Pin the pocket along the three edges to be sewn and in the centre to keep it in place.
Stitch as close to the edge as possible along the first side, across the top and then down the other side. Remember to backstitch at the start and end.
Quilt two rows of stitching from the edge of the pocket to three quarters of the way down the quilt to keep the wadding in place and also to use as a guide when folding the quilt into the pocket.
To fold into the pocket lay inside material face up and fold sides in along the quilted stitching. Fold the cushion equally so that the third fold will place it on top of the pocket.
Reach inside the pocket to grasp the corners one at a time and pull through easing the quilt into the cushion front.
Making a quillow has been completed..........Congratulations.
Return from Making a Quillow to Quillows
Affiliate offers
Please take care with any soft furnishing that it does not come into contact with any heat source.
If you have found an error on this page or want some more information on sewing cushions.
Please contact me . Thank you


New! Comments
Have your say about what you just read! Leave me a comment in the box below.